
Upgrading your bathroom with a new dual flush toilet is one of the most effective ways to modernize your home and reduce water consumption. Many homeowners find that their older toilets are prone to leaks and use far more water than necessary with every single flush. By choosing a dual flush model, you can select the appropriate amount of water needed for each use, which helps the environment and your monthly utility bills. Handydads recommends taking your time with this project to ensure a leak-proof seal that will last for many years to come. This guide provides all the necessary steps and professional advice to help you complete this installation with confidence and ease.
Project Snapshot
This project involves removing an old toilet and installing a more efficient dual flush unit in its place. Most people can complete this task in about two to three hours if they have all their supplies ready beforehand. It requires moderate physical effort as toilets can be heavy and awkward to lift into position. You should clear the surrounding area in the bathroom to give yourself plenty of space to work safely. Handydads suggests having a helper nearby to assist with the heavy lifting and to ensure the new toilet is aligned perfectly over the wax ring.
Tools and Materials
You will need a new dual flush toilet kit that includes the tank, bowl, and seat for a complete installation. A new wax ring or a foam toilet gasket is essential to prevent leaks at the base of the fixture. You should also have a set of new closet bolts to secure the toilet to the floor flange properly. Common hand tools like an adjustable wrench, a flathead screwdriver, and a pair of pliers are necessary for tightening the connections. Handydads also recommends having a sponge, a bucket, and some old towels on hand to manage any remaining water in the old lines.
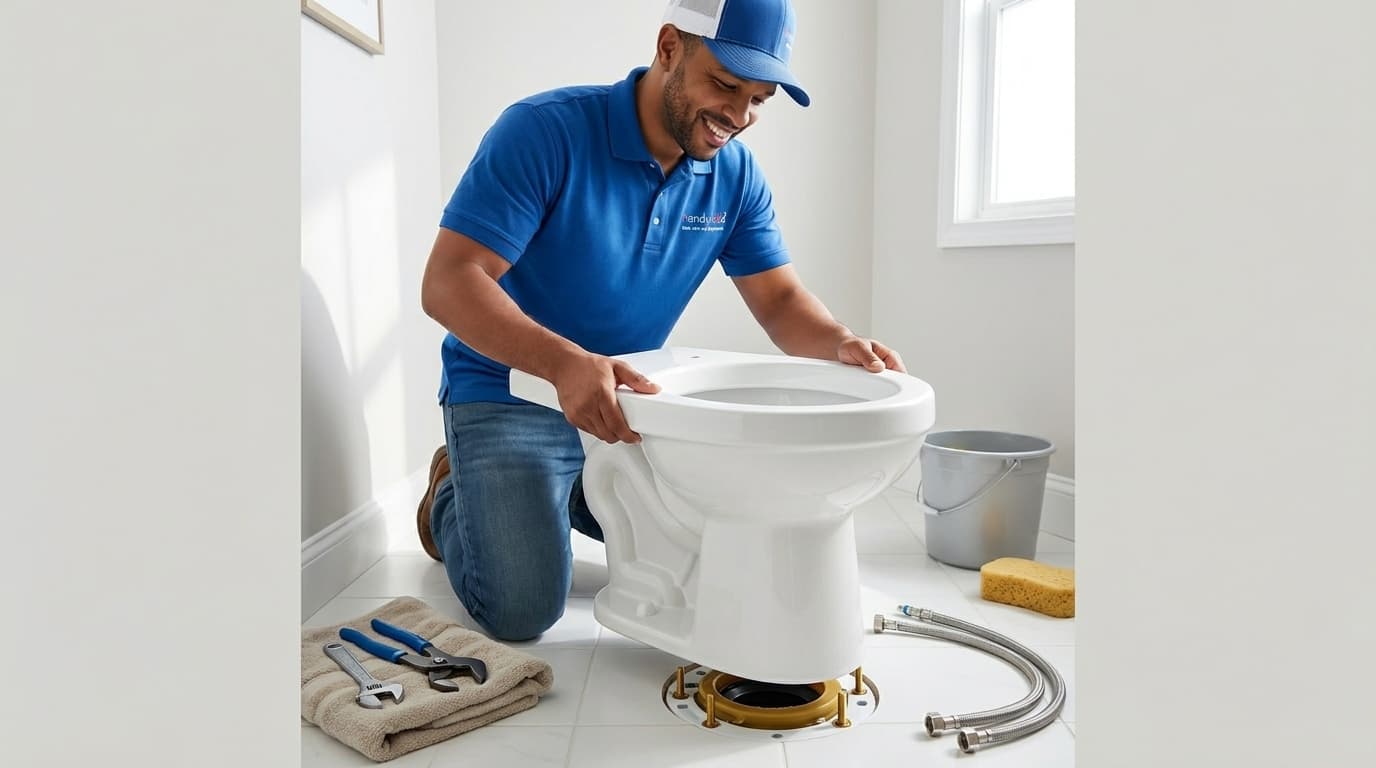
Step-by-Step Instructions
First, you must shut off the water supply valve located behind the toilet and flush the unit to drain the tank completely. Use a sponge to remove any remaining water from the bottom of the bowl and the tank before you begin disconnecting the parts. Disconnect the water supply line from the tank and then remove the floor bolts that hold the toilet to the bathroom floor. Carefully lift the old toilet up and away from the flange and place it on a piece of cardboard or an old towel. Clean the old wax off the floor flange using a putty knife and ensure the surface is smooth for the new seal. Place the new wax ring onto the flange or the bottom of the new toilet bowl according to the manufacturer instructions. Lower the new bowl onto the closet bolts and apply firm pressure to set the seal before tightening the nuts and washers. Attach the tank to the bowl using the provided hardware and then reconnect the water supply line to the fill valve. Finally, turn the water back on and flush the toilet several times to check for any leaks around the base or connections. You should check the water levels in the tank to ensure the dual flush mechanism is operating at the correct heights.
From the Toolbox
One of the lead technicians at Handydads remembers a time when a simple toilet swap turned into a major cleanup job because the homeowner forgot to drain the bowl. They had removed the bolts and lifted the unit only to have a gallon of water spill across the brand new hardwood floors in the hallway. We spent the next hour drying the area instead of finishing the installation as we had originally planned. It was a great reminder that preparation is the most important part of any home improvement project. Now we always double check that every drop of water is gone before moving a fixture.
Top 5 Mistakes
Many homeowners fail to remove all the old wax from the floor flange which prevents a proper seal with the new ring. Another common error is over-tightening the floor bolts which can cause the porcelain base to crack or shatter. Some people forget to level the toilet which leads to wobbling and eventually breaks the watertight seal. Reusing an old water supply line is also a mistake because these hoses often fail when they are disturbed. Finally, many DIYers do not check the floor flange for damage or cracks before they try to secure the new toilet bolts.
Tool and Material Recommendations
A high quality waxless foam gasket is often easier for beginners to install than a traditional wax ring. You should look for a dual flush toilet that is WaterSense certified to ensure maximum efficiency and performance. A set of plastic shims is very helpful for leveling the toilet on uneven tile or vinyl floors. Handydads suggests using a flexible braided stainless steel supply line for the most reliable connection to your plumbing. A small tub of plumbers putty might also be useful for sealing the base where it meets the floor for a finished professional look.
Quick Tips and Hacks
Use a shop vacuum to quickly suck out the remaining water from the bowl and tank after you shut off the valve. If your floor bolts are too long and prevent the decorative caps from snapping on, you can trim them with a hacksaw. Place a bead of clear silicone caulk around the front and sides of the base but leave the back open to spot any potential leaks. You can test for leaks at the base by adding a few drops of food coloring into the tank water. Always keep a set of old towels nearby because even the most careful plumber will encounter a small amount of stray water.