
Installing a new interior door is one of the most effective ways to refresh the appearance of any room in your house. While the task might seem daunting to a novice DIY enthusiast Handydads makes the process straightforward and manageable. Choosing a pre hung door saves a significant amount of time because the door is already attached to its own frame. This project allows you to improve both the visual appeal and the sound dampening qualities of your living space. Follow these detailed instructions to ensure your new door operates smoothly and looks like it was installed by a professional.
Project Snapshot
This interior door installation project is rated at an intermediate difficulty level for most homeowners. You should expect to spend approximately two to four hours completing the task from start to finish. It is helpful to have a second person available to help hold the door steady during the initial placement phase. Handydads recommends performing this upgrade during a time when you can keep the work area clear of foot traffic. Success depends heavily on your ability to take precise measurements and maintain a patient approach to the leveling process.
Tools and Materials
The essential tools for this job include a standard hammer or a pneumatic finish nailer for securing the frame. You will also need a high quality four foot level to ensure the door sits perfectly straight within the wall. Wooden shims are absolutely necessary for filling the gaps between the door jamb and the structural framing. A measuring tape and a cordless drill will help with the final hardware installation and hinges. Finally, make sure you have a set of finish nails and some wood glue to create a lasting and sturdy bond.
Step-by-Step Instructions
-
Start by carefully removing the old door and the existing trim pieces from the rough opening. You should use a pry bar to gently pull the casing away from the wall without damaging the drywall. Once the opening is clear you must measure the width and height to confirm the new door will fit properly. Handydads suggests vacuuming the floor area to ensure no debris interferes with the level placement of the new frame. Checking for any protruding nails in the studs is also a critical step before you proceed with the new unit.
-
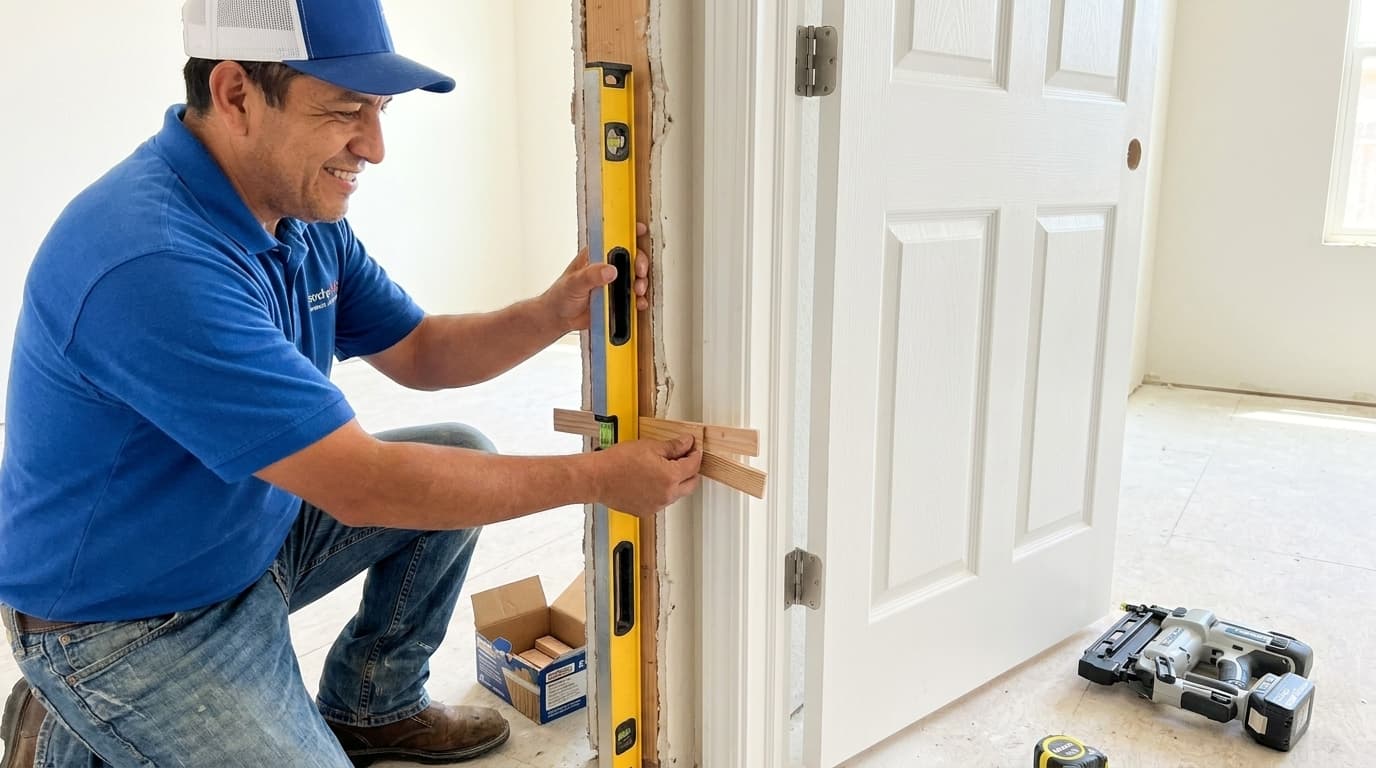
Position the pre hung door into the opening and check the hinge side for vertical alignment. Use your level to determine if the jamb is perfectly plumb on both the front and side faces. You may need to slide the bottom of the frame slightly to the left or right to find the sweet spot. It is helpful to have an assistant hold the top of the door while you work on the bottom sections. This alignment is the foundation of a door that swings correctly without sticking or drifting on its own.
-
Insert wooden shims into the gaps between the hinge side jamb and the wall studs at three different points. You should place one shim near the top hinge, one near the middle, and one near the bottom hinge. These shims provide a solid surface for the nails to pass through into the structural wood behind the jamb. Check the level again after inserting each shim to make sure nothing has shifted out of place. Handydads recommends using two shims per point facing opposite directions to create a flat and even shim thickness.
-
Secure the hinge side of the door jamb to the studs using two and a half inch finish nails. Drive the nails directly through the jamb and the shims into the solid wood of the wall framing. Be careful not to hammer too hard as you might dent the finished surface of the new door frame. If you are using a nail gun ensure the pressure is set correctly to sink the nail head just below the wood surface. Periodically check that the door still opens and closes freely during this fastening process to catch any issues early.
-
Move to the latch side of the door and repeat the shimming process to ensure the gap between the door and frame is even. This gap is known as the reveal and it should be consistent across the top and both sides of the door. If the gap is wider at the top than the bottom you will need to adjust the shims accordingly. Fasten the latch side jamb once you are satisfied that the door operates perfectly and the reveals are uniform. Handydads technicians always test the latch multiple times to confirm it clicks into place without any resistance or rubbing.
-
Once the door frame is securely nailed in place you can install the door handle and the strike plate hardware. Ensure the latch aligns perfectly with the hole in the strike plate so the door stays closed when shut. If the latch does not engage you may need to slightly adjust the position of the strike plate on the jamb. After the hardware is functioning correctly you can proceed to install the decorative trim or casing around the frame. Handydads suggests using a small amount of wood filler to cover the nail holes for a seamless and high quality finished appearance.
From the Toolbox
I once worked on a renovation where the homeowner had tried to install three doors without using any shims at all. The doors were constantly swinging shut on their own and none of the latches actually lined up with the strike plates. We had to remove all the trim and start from scratch to fix the alignment issues for them. It was a great lesson in why taking the time to level the hinge side is the most important part of the job. Handydads takes pride in doing the job right the first time so the hardware stays functional and reliable for decades.
Top 5 Mistakes
The most common mistake is failing to verify that the floor is level before the door is set in place. Another frequent error involves over tightening nails which causes the door jamb to bow inward and bind the door. Many people also forget to leave enough room at the bottom for the specific type of flooring in the room. Using nails that are too short to reach the wall studs will result in a door that eventually sags or falls. Finally, skipping the use of a level and simply eyeing the door is a recipe for a frustrating and crooked installation that will not last.
Tool and Material Recommendations
We recommend using composite shims because they do not shrink or rot like traditional wood shims can over time. A solid core door is a superior choice over hollow core options because it provides much better sound insulation for bedrooms. Handydads suggests investing in a high quality sixteen gauge finish nailer for a much cleaner and more professional look. Using a dedicated door installation kit can also help ensure your hardware is perfectly centered on the very first try. High strength wood glue applied to the shim points adds an extra layer of durability and stability to the entire door assembly.
Quick Tips and Hacks
You can use a long screw through the top hinge into the wall stud to prevent the door from sagging over time. If the door tends to swing open by itself try bending one of the hinge pins slightly to create extra friction. Applying a small amount of lubricant to the hinges will ensure the door operates silently and smoothly for many years. Scoring your shims with a utility knife makes it much easier to snap them off flush with the wall surface. Handydads always suggests painting the top and bottom edges of the door to prevent moisture from causing the wood to swell or warp.