
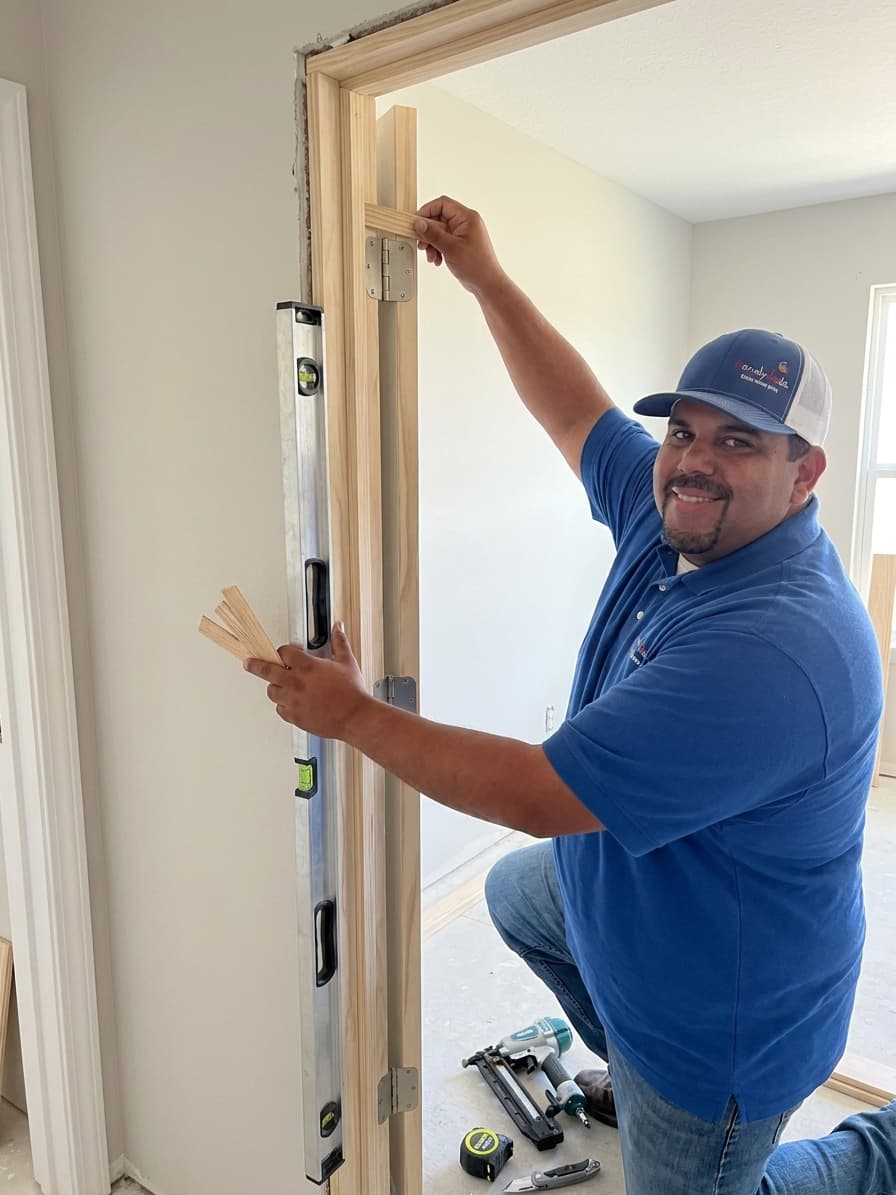
Changing out an old or damaged interior door can instantly refresh the look of your home while improving privacy and sound dampening between rooms. Many homeowners find the prospect of hanging a door daunting because of the precision required for a perfect fit and smooth swing. At Handydads we believe that with the right preparation and patience anyone can master the art of installing a prehung door. This guide will walk you through the entire process from removing the old trim to adjusting the hinges for a seamless finish. By following these steps you will ensure your new door operates perfectly and looks like it was installed by a seasoned professional.
Project Snapshot
Installing a new interior door is a fantastic way to update the style of any room in your house. This project is manageable for most DIY enthusiasts who have basic tools and some patience. You should plan to set aside a few hours to complete the task from start to finish properly. Handydads recommends having a helper nearby to assist with lifting the door into place. Below you will find the key metrics regarding the time and effort required for this installation.
- Time: 3-4 hours
- Difficulty: Intermediate
- Category: Home Improvement
Tools and Materials
Gathering all your supplies before you begin the work will keep the process moving smoothly and efficiently. You will need a variety of hand tools and some basic power equipment to get the job done right. Having the correct size of shims and nails is critical for securing the door frame permanently. Handydads suggests organizing your workspace so that everything is within easy reach while you are balancing the door. Here is a comprehensive list of what you will need for this particular home improvement project.
- Prehung door unit
- Wooden shims
- 2.5-inch finish nails
- Hammer or pneumatic nailer
- 4-foot level
- Tape measure
- Utility knife
- Wood glue and wood filler
- Power drill and 3-inch screws
- Miter saw
Step-by-Step Instructions
Before you begin the physical installation you should verify that the new door matches the dimensions of your rough opening. It is much easier to exchange a door at the store before you have started the demolition process. Handydads encourages all homeowners to read through every step before picking up a hammer. This preparation ensures that you have a clear mental map of the project workflow. Follow these detailed instructions to achieve a perfect door installation in your home.
Prepare the Rough Opening
Begin by removing the old door and its trim carefully to avoid damaging the surrounding drywall or plaster. You should use a utility knife to score the paint line where the trim meets the wall to prevent peeling. Once the old frame is out you need to inspect the rough opening for any protruding nails or debris. Check the floor with a level to see if one side of the opening is higher than the other. If the floor is significantly out of level you may need to trim the bottom of one of the door jambs accordingly.
Position the Prehung Unit
Lift the new prehung door unit into the opening and center it as best as possible. Place a few shims at the top of the frame to hold it loosely in place while you work. Ensure that the hinge side of the door is perfectly vertical by using a high quality four foot level. It is often helpful to have a second person hold the frame steady while you make your initial adjustments. Check that there is a consistent gap between the door slab and the frame at the top and sides.
Plumb and Level the Frame
Slide wooden shims into the gaps between the door jamb and the wall studs at each hinge location. You must be careful not to over-tighten the shims because this can cause the jamb to bow inward. Once the hinge side is plumb and level you can secure it by driving finish nails through the jamb and shims into the studs. Repeat this process on the latch side of the door while frequently checking the operation of the door. The door should open and close freely without rubbing against the frame or swinging on its own.
Secure with Fasteners
After the frame is secured you can go back and fill any remaining gaps with additional shims for stability. Use a handsaw or a sharp utility knife to score and snap off the protruding ends of the shims. You may want to replace one of the short factory screws in the top hinge with a longer three inch screw for added strength. This long screw reaches all the way into the wall framing to prevent the door from sagging over time. Double check the level and plumbness one last time before moving on to the final finishing touches.
Install Hardware and Trim
Install the door casing or trim around the new frame to hide the gaps and shims from view. Use a miter saw to cut the corners at a forty five degree angle for a clean and professional look. Secure the trim with finish nails and use wood filler to hide the nail holes before painting. Attach your chosen door handle and strike plate according to the manufacturer instructions provided with the hardware. Give the entire project a final wipe down and enjoy the improved aesthetics and functionality of your new interior door.
From the Toolbox
I once arrived at a job site where the homeowner was frustrated that their brand new door kept drifting open. They had spent hours trying to force the latch to stay put but the physics of an unlevel hinge side were working against them. At Handydads we see this often and it usually stems from a rushed installation without using a proper level. I spent about an hour removing the trim and resetting the shims to ensure the frame was perfectly plumb. The look of relief on the client face when the door finally stayed in place was truly the best part of the day.
Top 5 Mistakes
Avoiding common pitfalls is essential when you are learning how to hang a door for the first time. Many people underestimate the importance of a level floor or the precision needed for shimming. At Handydads we have seen many DIY projects go wrong because the installer rushed through the leveling process. Taking your time to ensure the frame is perfectly square will save you hours of adjustments later on. Here are the most frequent errors we see homeowners make during this specific project.
- Not checking if the floor is level before setting the jambs.
- Over-shimming which causes the door frame to bow and the door to stick.
- Using nails that are too short to reach the wall studs.
- Forgetting to score the paint on old trim resulting in torn drywall.
- Failing to check that the door is plumb in both directions.
Tool and Material Recommendations
Choosing the right equipment is just as important as the technique you use during the installation process. High quality tools allow you to make micro adjustments that result in a much better final product. We recommend investing in a few key items that will serve you well for years of home maintenance. Handydads always suggests prioritizing accuracy by using reliable measuring and leveling instruments. These specific materials and tools will help you achieve the professional results you are looking for.
- Stabila 48-inch level for guaranteed accuracy
- Bostitch pneumatic finish nailer for fast and clean fastening
- Nelson Wood Shims for consistent thickness and easy snapping
- Schlage door hardware for a durable and stylish finish
- Purdy brushes for applying a smooth finish to your new trim
Quick Tips and Hacks
There are several professional secrets that can make the installation of a prehung door much easier. These small adjustments can prevent common frustrations like sagging frames or sticking latches. At Handydads we always look for ways to streamline home improvement tasks for our readers. Implementing these hacks will provide extra stability and a cleaner look to your finished project. Please consider these additional pointers as you work through your home renovation journey.
- Use a scrap piece of wood and a hammer to tap shims into place without damaging the frame.
- Apply a small bead of wood glue to the shims for a permanent hold that won-t shift over time.
- Keep the shipping plug in the door until the frame is fully secured to maintain the factory alignment.
- If the door swings open on its own you can slightly bend a hinge pin to create a tiny bit of friction.
- Always check the swing clearance of the door to ensure it does not hit furniture or light fixtures.