
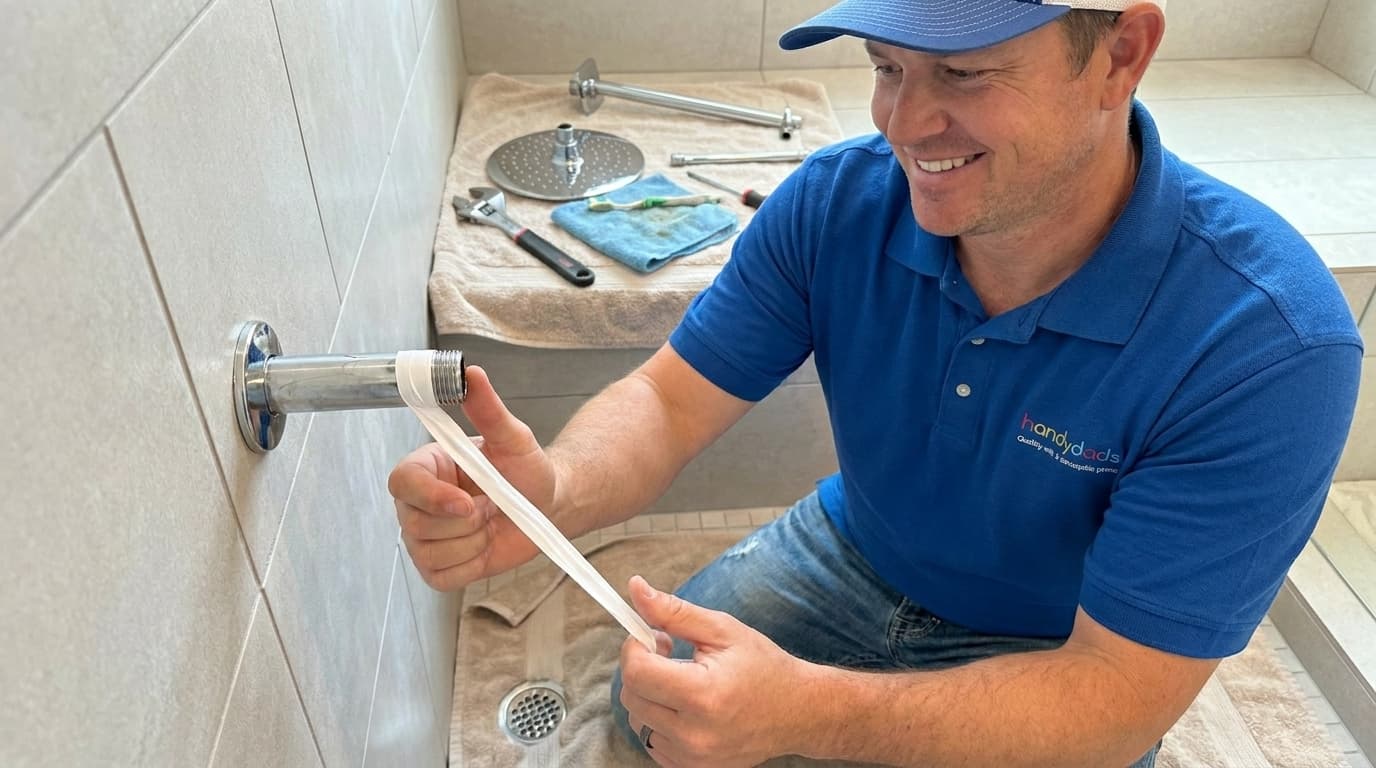
Upgrading your bathroom does not always require a full renovation to feel like a luxury spa experience. At Handydads we believe that small changes often yield the most significant results for your daily comfort and home value. Installing a rainfall shower head with an extension arm is a perfect weekend project for any homeowner looking to improve their morning routine. This project allows you to achieve that overhead drenching sensation without having to replumb your entire shower wall or ceiling. By following our guide you will learn how to properly seal connections and ensure a leak free installation that lasts for many years to come.
Project Snapshot
Understanding the scope of your work is the first step toward a successful home improvement project. This specific upgrade is designed to be manageable for people with various levels of handyman experience. Handydads provides this overview so you can plan your time and effort accordingly before you begin the work. You will find that this task requires minimal heavy lifting but focuses more on precision and care. Reviewing the snapshot helps set realistic expectations for how long the process will take from start to finish.
- Time: 30 to 45 minutes
- Difficulty: Beginner
- Impact: High luxury upgrade
Tools and Materials
Having the correct supplies on hand is essential for completing any home improvement task efficiently. You do not need a vast collection of professional plumbing gear to successfully install a new shower head. Most of these items are readily available at your local hardware store or may already be in your garage. Using the right materials like high quality thread tape will make the difference between a dry floor and a constant leak. Handydads suggests organizing your workspace before you start to keep the process organized and stress free.
- Adjustable wrench
- Microfiber cloth or rag
- Plumber thread seal tape
- Rainfall shower head kit
- Wall mounted extension arm
- Old toothbrush for cleaning
Step-by-Step Instructions
1. Prepare the work area
Before you begin any plumbing task you must ensure the water is turned off completely at the shower handle. You should place a towel over the drain to prevent any small parts or screws from falling into the plumbing system. Handydads recommends gathering all your tools within reach so you do not have to step out of the tub once you start. Take a moment to inspect the existing shower arm for any signs of corrosion or structural damage. If the pipe inside the wall looks rusty it might be time to call a professional for a deeper repair.
2. Remove the existing fixture
Use an adjustable wrench to slowly loosen the old shower head by turning it counter-clockwise. You can wrap a rag around the fixture to prevent the metal teeth of the wrench from scratching the finish. Once the head is loose enough you should be able to unscrew it the rest of the way by hand. Carefully set the old hardware aside in case you need to use it in another bathroom or as a temporary backup. Clean off any residual plumber's tape or debris from the pipe threads using an old toothbrush or a damp cloth.
3. Apply the thread seal tape
The secret to a leak free connection is the proper application of seal tape on the male threads of the pipe. Hold the end of the tape against the threads and wrap it tightly in a clockwise direction at least three or four times. Wrapping it clockwise ensures that the tape stays tight as you screw the new extension arm onto the pipe later. Make sure the tape covers the entire threaded area but does not hang over the edge into the water flow path. Handydads suggests smoothing the tape down with your thumb to ensure it is seated firmly into the grooves of the metal.
4. Install the new extension arm
Take your new wall mounted extension arm and thread it onto the pipe coming out of the shower wall. Start the threads by hand to ensure you do not cross-thread the delicate metal connections which could lead to permanent damage. Once it is hand tight you can use your wrench to give it one final quarter turn for a secure fit. Ensure the arm is pointing in the desired direction and is level with the floor for the best visual result. If the arm feels loose or wobbly you may need to add more tape or check the depth of the wall pipe.
5. Attach the rainfall shower head
Most rainfall shower heads simply screw onto the end of the extension arm using a similar threaded connection. Check if there is a rubber washer included in the shower head kit and ensure it is seated flat inside the connector. Screw the head onto the arm until it is snug and then adjust the pivot joint to your preferred angle. Turn on the water slowly to check for any drips at the connection points or along the length of the arm. If you see a leak simply tighten the connection slightly or re-apply the tape for a better seal.
From the Toolbox
One time I helped a neighbor who tried to install a shower head without using any tape at all. They were surprised when water started spraying out of the back of the fixture and onto the ceiling. I explained that Handydads always uses high quality sealant to prevent these types of common household headaches. We spent a few minutes cleaning up the mess before doing the job the right way with proper materials. It was a great reminder that even the simplest jobs require attention to detail to avoid a watery disaster.
Top 5 Mistakes
Avoiding common pitfalls is the best way to ensure your project goes smoothly from start to finish. Handydads has seen many homeowners struggle with simple plumbing tasks because they rushed through the process. By understanding these frequent errors you can save yourself time and potential repair costs in the future. Proper technique is just as important as having the right tools for the job. Please review these common mistakes carefully before you pick up your wrench to begin.
- Over-tightening the connections which can crack the plastic or metal fittings.
- Wrapping the thread tape in the wrong direction causing it to unravel during installation.
- Forgetting to place a towel over the drain resulting in lost washers or screws.
- Using pliers directly on the chrome finish without a protective cloth barrier.
- Ignoring a small drip which can lead to mold growth behind the shower wall.
Tool and Material Recommendations
Choosing the right products can significantly impact the longevity and performance of your new bathroom fixture. We have selected a few items that provide excellent durability and ease of installation for the average DIY enthusiast. Handydads always looks for materials that resist corrosion and maintain their appearance over many years of heavy use. Investing in quality tools now will save you from having to replace them after just a few uses. These specific recommendations are designed to help you achieve a professional result with minimal effort and frustration.
- 12 inch Stainless Steel Rainfall Shower Head
- Adjustable S Shaped Shower Arm Extension
- High Density PTFE Thread Seal Tape
- Soft Grip Adjustable Wrench
- Microfiber Cleaning Cloths
Quick Tips and Hacks
Small tricks of the trade can often make a difficult job feel much easier and more manageable. Handydads has gathered these helpful hints from years of experience working on various home plumbing projects. Implementing these ideas can help you overcome stubborn hardware or improve the final look of your installation. Even if you are an experienced handyman you might find a new technique that speeds up your next project. Take a moment to read through these extra suggestions to ensure your shower upgrade is truly a success.
- Soak your old shower arm threads in vinegar to remove stubborn calcium buildup.
- Check the flow restrictor in your new shower head if you prefer higher water pressure.
- Use a level to ensure your extension arm is perfectly horizontal before tightening.
- Always keep a spare set of rubber washers in your toolbox for emergency plumbing repairs.
- Test the height of the rainfall head to ensure the tallest person in the house fits comfortably under it.