
Upgrading to a smart thermostat is one of the most effective ways to modernize your home and reduce monthly utility bills. This project allows you to control your home temperature from anywhere using a smartphone or voice commands. Many homeowners find that the initial setup takes less than an hour and provides immediate comfort benefits. Handydads recommends this upgrade for anyone looking to optimize their heating and cooling cycles throughout the year. It is a straightforward task that requires only a few basic tools and a bit of patience with wiring.
Project Snapshot
This project is rated at a beginner difficulty level and can typically be completed in under one hour. You will only need basic hand tools such as a screwdriver and a level to achieve a professional result. It is an excellent way to improve your home efficiency and modern technology integration without needing a professional contractor. The primary goal is to safely replace an old manual unit with a modern digital interface that supports Wi-Fi connectivity. Handydads considers this one of the most rewarding quick weekend projects for any modern homeowner.
Tools and Materials
You will need a high quality smart thermostat that is compatible with your current heating and cooling system. A multi-bit screwdriver set is essential for removing old hardware and installing the new mounting plate. It is also helpful to have needle nose pliers on hand for handling small wires and ensuring a tight connection. A small torpedo level will help you keep the new device perfectly straight on your wall for a clean look. Lastly, make sure you have your smartphone ready to download the necessary app and complete the digital setup process.
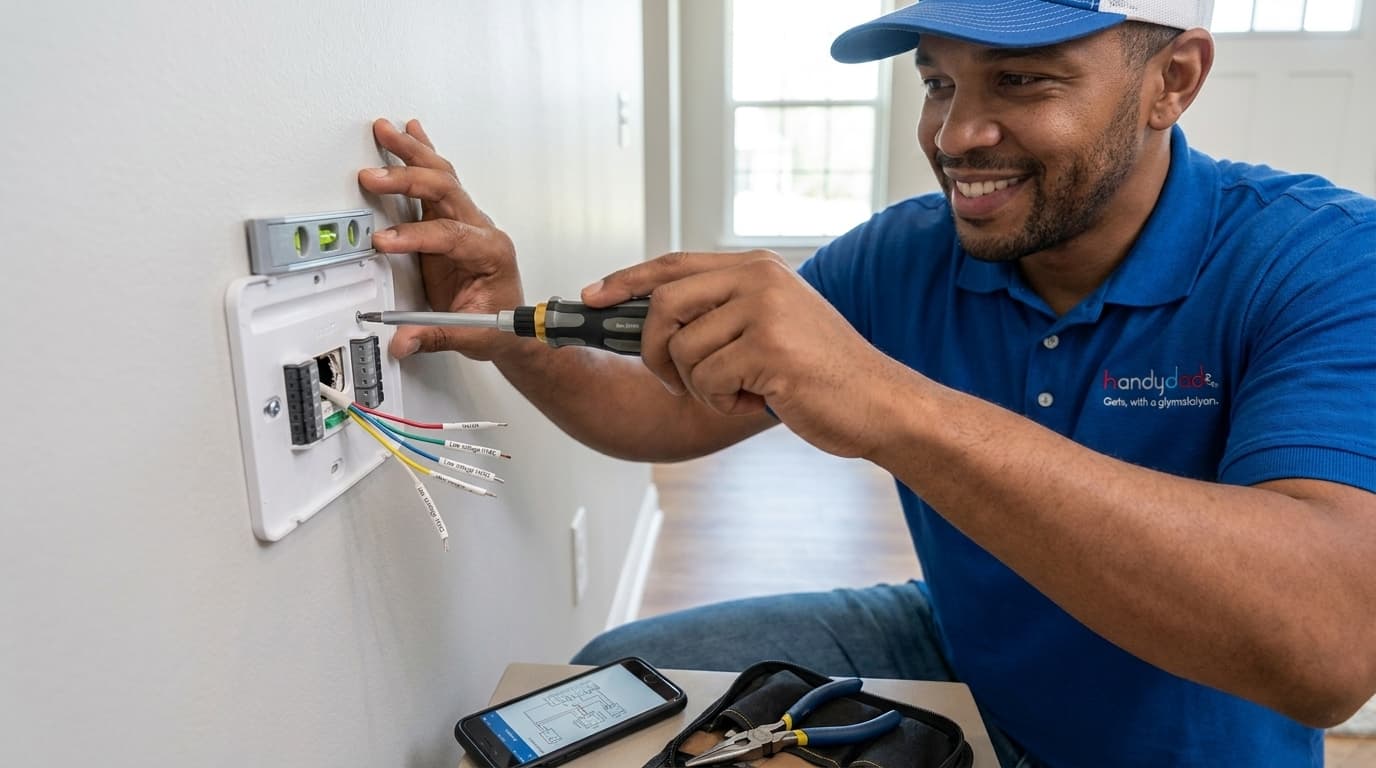
Step-by-Step Instructions
The first thing you must do is turn off the power to your HVAC system at the main breaker box to ensure safety. Once the power is off, remove the faceplate of your old thermostat to expose the wiring connections inside. Before you disconnect anything, use a smartphone to take a clear photograph of the existing wire configuration for future reference. Use the labels provided in your new kit to mark each wire according to the letter on the terminal it is currently connected to. After the wires are labeled and disconnected, you can unscrew the old wall plate and gently pull the wires through the center hole.
Mount the new wall plate by feeding the wires through the opening and securing it to the wall using a level to ensure it is straight. You should then insert each wire into its corresponding terminal on the new smart thermostat base as indicated by your previous labels. Once the wires are secure, carefully push any excess wire back into the wall and snap the new thermostat faceplate onto the base. Head back to your breaker box to restore power and wait for the device to boot up for the first time. Finish the process by following the on-screen prompts to connect the device to your home Wi-Fi network and mobile app.
From the Toolbox
I remember visiting a client who was convinced their furnace was broken because the house was freezing every morning. It turned out they had an ancient dial thermostat that was sticking in the off position. We installed a new smart model and set up a morning warm up schedule that changed their daily routine. They were amazed at how much more comfortable the house felt just by automating the temperature. Seeing that relief on a homeowner face is why we love what we do at Handydads.
Top 5 Mistakes
The most common error is forgetting to turn off the power which can blow a fuse in your furnace control board. Another frequent issue occurs when homeowners pull too hard on the wires and they slip back into the wall cavity. Many people fail to use a level during installation which results in a lopsided device that looks unprofessional. Some installers neglect to check if they have a common wire or C-wire which is required for most smart models to function properly. Finally, skipping the step of taking a reference photo often leads to confusion during the wiring process and potential system damage.
Tool and Material Recommendations
The Google Nest Learning Thermostat is a top choice for those who want a device that adapts to their schedule automatically. For those on a budget, the Ecobee Lite offers many of the same smart features with an easy-to-use interface. We recommend using a Klein Tools multi-bit screwdriver because it provides the versatility needed for different screw types found in older homes. A Stanley torpedo level is small enough to fit in your pocket while providing the accuracy needed for a level installation. Handydads also suggests keeping a roll of color coded electrical tape nearby to help with wire identification if labels are missing.
Quick Tips and Hacks
Always take a photo of the old wiring before disconnecting anything so you have a visual guide to follow. If you lack a C-wire, look for a power extender kit which is often included in many modern smart thermostat boxes. Use a small piece of painter tape to secure wires to the wall so they do not fall back into the hole during the swap. Fill the hole behind the thermostat with a small piece of insulation to prevent wall drafts from causing inaccurate temperature readings. Check for software updates immediately after connecting the device to your home Wi-Fi network to ensure you have the latest features.