
Upgrading your home with a smart thermostat is one of the easiest ways to improve energy efficiency and save money on monthly utility bills. Many homeowners feel intimidated by electrical components but the process is actually quite straightforward for a weekend DIY enthusiast. When you choose to install a modern device you gain the ability to control your home climate directly from your smartphone or voice assistant. Handydads recommends this project because it provides an immediate return on investment through reduced energy consumption throughout the year. You will find that most modern systems are designed for quick installation with clear labeling and intuitive wiring ports.
Project Snapshot
This project typically takes about forty-five minutes to complete from start to finish. It is rated as an easy to moderate difficulty level depending on your existing wiring configuration. Most homeowners can expect to spend between one hundred and two hundred fifty dollars for a high quality unit. You do not need any specialized electrical training to handle this minor upgrade safely. Handydads suggests performing this installation during the day when there is plenty of natural light available in your home.
Tools and Materials
To complete this project you will need a standard screwdriver set including both flathead and Phillips head options. Needle nose pliers are very helpful for handling and positioning the small copper wires into their new terminals. You must have a bubble level on hand to ensure that the thermostat faceplate is perfectly straight once it is mounted. A power drill with small masonry or wood bits will be necessary for installing the wall anchors and base plate screws. Finally make sure you have masking tape or dedicated wire labels to keep track of your connections during the swap.
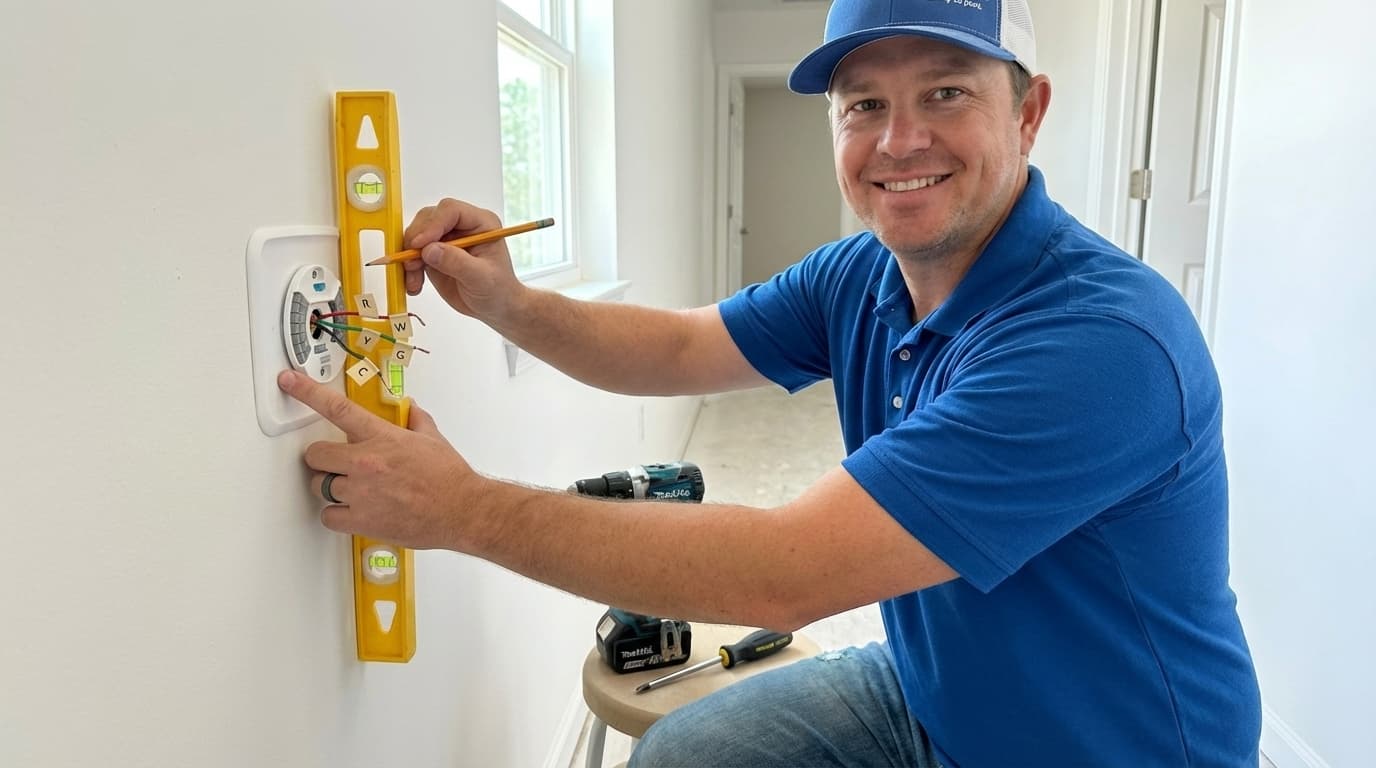
Step-by-Step Instructions
First you must go to your main electrical panel and switch off the power to your HVAC system to ensure safety. Once the power is off you can remove the old thermostat faceplate to reveal the existing wiring connections. Take a clear photograph of the current wires and then use your masking tape to label each wire according to its terminal letter. Carefully unscrew the wires from the old base plate and gently pull them through the center of the unit. You can then remove the old base plate from the wall and prepare for the new installation. Place the new base plate against the wall and use your level to make sure it is perfectly horizontal before marking the screw holes. Drill your pilot holes and insert any necessary wall anchors provided in your smart thermostat kit. Pull the wires through the new base plate and secure the plate to the wall using the included screws. Insert each labeled wire into the corresponding terminal on the new base until you hear a click or feel it seat properly. Finally snap the new thermostat faceplate onto the base and return to your breaker box to restore the power. Follow the on-screen instructions on the device to connect it to your home wireless network and complete the setup.
From the Toolbox
I remember visiting a client who complained that their house was always freezing when they got home from work in the winter. They had an ancient manual dial thermostat that was likely original to the house and required constant adjustment. We spent about thirty minutes installing a new smart model and the look of relief on their face was priceless when they saw the mobile app. It transformed their daily routine because they could finally schedule the heat to kick on right before they left the office. At Handydads we believe that small technology upgrades make the biggest difference in home comfort levels for every family.
Top 5 Mistakes
Many people make the mistake of failing to turn off the power at the main circuit breaker which can damage your HVAC control board. Another common error is pulling the wires too hard and accidentally losing them behind the drywall cavity during the transition. Forgetting to take a photo of the original wiring configuration often leads to massive confusion during the new setup process. Some homeowners overlook the need for a C-wire or a specialized power adapter which prevents the device from staying charged. Finally you must avoid stripping the screw holes in the drywall by over-tightening the base plate without using proper wall anchors.
Tool and Material Recommendations
We recommend the Nest Learning Thermostat for those who want automated energy savings without manual programming. The Ecobee Smart Thermostat is another great choice because it includes remote room sensors for more accurate temperature control. You should use a high quality precision screwdriver set for handling the small terminal screws found on most modern devices. A non-contact voltage tester pen is an essential tool for added electrical safety during any home project involving wiring. Handydads also suggests picking up a matching wall trim plate to ensure a clean finish if your new unit is smaller than the old one.
Quick Tips and Hacks
Use a level during base plate installation to ensure the screen looks professional and straight on your wall. You should wrap the wires around a pencil to prevent them from accidentally slipping back into the wall cavity while you work. Take a high resolution photo of your old wiring before disconnecting anything to serve as a permanent reference guide. Always check your HVAC compatibility online before purchasing a new device to ensure it works with your specific furnace or air conditioner. If your wall has a large hole from the old unit you can buy a matching trim plate to cover the gap without needing to paint.