
Upgrading the baseboards in your home is one of the most effective ways to refresh the overall appearance of any room. Many homeowners overlook how much a crisp new profile can change the aesthetic of their living space from dated to modern. When you choose the right materials and follow a systematic approach, this project becomes an achievable task for any dedicated DIYer. The team at Handydads understands that precision is the key to achieving professional results that will stand the test of time. By taking your time and focusing on the details of the corners and transitions, you can create a beautiful finished product that adds value to your property.
Project Snapshot
- Difficulty: Moderate
- Time: 4-6 hours
- Impact: High
Tools and Materials
- Miter saw
- Pneumatic brad nailer
- Wood glue
- Measuring tape
- Caulk and caulk gun
- Baseboard moulding
- Wood filler
- Sanding block
Step-by-Step Instructions
Before you pick up a saw, you must accurately measure every wall in the room to determine the total linear footage required for the job. It is always wise to add an extra ten percent to your final measurement to account for mistakes or waste during the cutting process. Use a high-quality steel tape measure to ensure that your readings are exact to within a sixteenth of an inch. Note down each measurement on a simple sketch of the room to keep your workflow organized as you move to the cutting station. Handydads recommends labeling the back of each piece of trim once it is cut so you do not mix up similar lengths.
Cutting the baseboards requires a miter saw capable of making precise forty-five degree angles for both inside and outside corners. For inside corners, you might choose to use a cope cut which involves cutting one piece flat against the wall and the other at an angle to fit the profile. Outside corners are generally handled by cutting two opposite forty-five degree angles that meet perfectly at the edge of the wall. Always test your cuts on scrap pieces of wood before committing to your final expensive trim materials. Handydads suggests wearing safety glasses and ear protection whenever you are operating power tools in a confined indoor space.
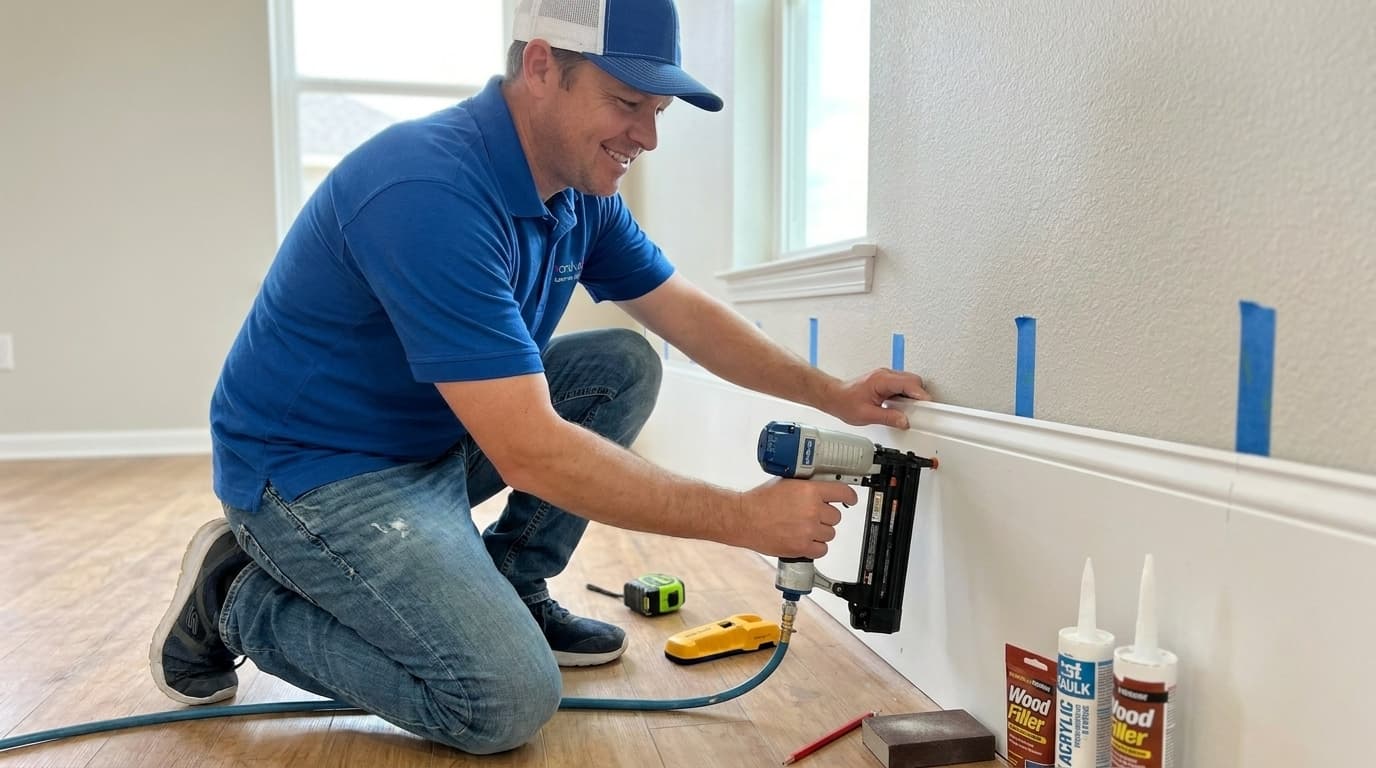
Once your pieces are cut to the correct length, it is time to locate the wall studs using an electronic stud finder. Mark the location of each stud with a small piece of painter's tape or a light pencil mark just above where the trim will sit. You want to ensure your nails penetrate the wooden framing of the house rather than just the thin layer of drywall. Using a pneumatic brad nailer allows you to secure the trim quickly without the risk of damaging the wood with a traditional hammer. Handydads advises using two-inch brad nails to ensure a deep and secure hold into the structural members of the wall.
After the trim is nailed securely in place, you must address the small gaps and nail holes to achieve a seamless look. Fill every nail hole with a high-quality wood filler and allow it to dry completely before sanding it smooth with the surface of the wood. Use a paintable acrylic caulk to fill the thin gap between the top of the baseboard and the wall for a professional finish. This step hides any imperfections in the wall surface and prevents dust from collecting behind the new trim. Handydads emphasizes that the quality of your finishing work is what truly separates a DIY job from a professional installation.
From the Toolbox
I remember helping a neighbor who tried to install baseboards using only a hand saw and a hammer. He was struggling with gaps in his corners that were wide enough to see through, and he was nearly ready to give up on the project entirely. I brought over my miter saw and showed him how to adjust the angles slightly to account for walls that were not perfectly square. We spent the afternoon working together, and by sunset, his living room looked like a professional showroom. It was a great reminder that having the right tools makes all the difference in the world for any Handydads project.
Top 5 Mistakes
- Failing to locate studs before nailing the trim in place.
- Not accounting for uneven floors which can create visible gaps.
- Cutting the wrong direction on miter angles causing wasted material.
- Skipping the wood glue on outside corners which leads to separation.
- Using silicone caulk instead of paintable acrylic which will not hold paint.
Tool and Material Recommendations
- 12-inch sliding compound miter saw for clean cuts.
- 18-gauge cordless brad nailer for ease of movement.
- Premium flexible paintable wood caulk.
- Pre-primed MDF or solid pine baseboard moulding.
- Sanding sponge with a fine grit for smoothing filler.
Quick Tips and Hacks
- Use a scrap piece of trim as a spacer when measuring tight spots.
- Back-cut your miter joints slightly to ensure the front edges touch first.
- Keep a damp rag handy to wipe away excess caulk immediately.
- Always paint the trim before you install it to save time on masking.
- Rub a white candle on the cut ends to help seal the grain before gluing.