
A high quality bathroom exhaust fan is essential for maintaining a healthy indoor environment by removing excess moisture and odors. When these units fail, you might notice peeling paint or persistent mold growth on your ceiling and walls. Replacing an old or noisy fan is a project that Handydads frequently handles to help homeowners protect their property from water damage. This process involves working with both electrical components and ventilation ductwork to ensure the air moves outside correctly. By following a few careful steps, you can significantly improve the air quality in your home and keep your bathroom looking fresh for years to come.
Project Snapshot
Replacing a bathroom exhaust fan typically takes between two and four hours depending on the attic access available. This project is rated as an intermediate task because it involves both electrical wiring and light carpentry. By successfully completing this upgrade, you will protect your home from moisture damage and improve your overall indoor air quality. Handydads suggests having a second person available to help pass tools while you are working on a ladder. The primary goal is to ensure the new unit is powerful enough to clear the room in a reasonable amount of time.
Tools and Materials
Before you begin this project, you need to gather several specific items to ensure a smooth installation process. You will definitely need a new exhaust fan that is sized correctly for your bathroom square footage. Safety gear is also a high priority, so make sure you have goggles and a dust mask ready for the ceiling work. Having the right electrical tools will help you make secure connections that meet local building codes. Please review the following list of tools and materials before you start the disassembly of your old unit.
- Stepladder
- Screwdriver set
- Wire strippers
- Non-contact voltage tester
- Drywall saw
- Foil duct tape
- New exhaust fan unit
- Wire nuts
- Vacuum cleaner
- Safety goggles
Step-by-Step Instructions
-
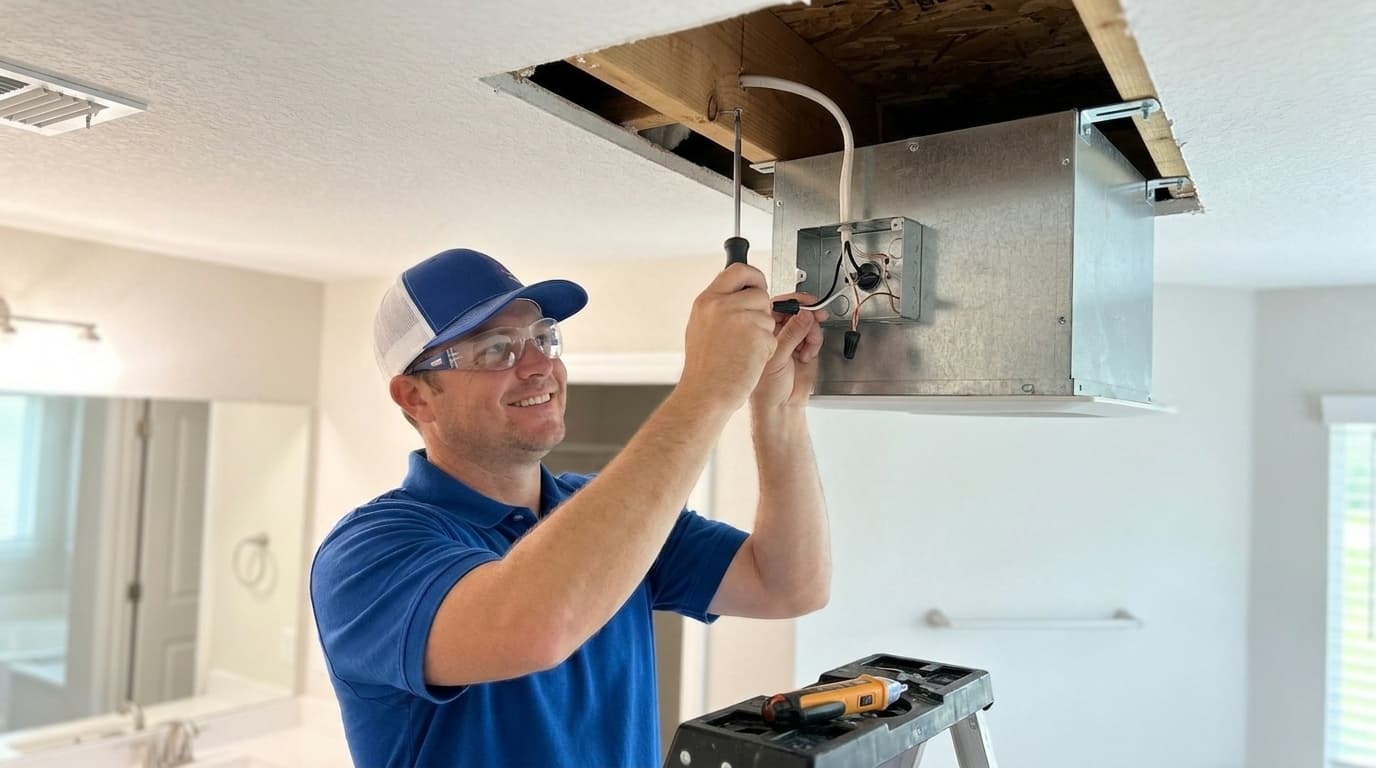
Turn off the power at the main circuit breaker to ensure a safe working environment. Use a non-contact voltage tester to verify that no electricity is flowing to the fan unit. Carefully remove the plastic cover or grille from the existing fan by pulling it down and squeezing the metal springs. Disconnect any electrical plugs or wires inside the housing once you have confirmed the power is off. This initial preparation is the most important part of the entire project to prevent accidents.
-
Gain access to the attic if possible to disconnect the exhaust duct from the old fan housing. If you cannot reach the attic, you will need to work from below by removing the screws holding the housing to the joists. Carefully pull the old metal box down while guiding the electrical wires out of the way. Make sure you do not damage the surrounding drywall as you pull the unit through the ceiling opening. Having a helper to hold the ladder can make this part of the process much safer and easier.
-
Measure the existing ceiling hole to see if it needs to be enlarged for your new fan model. Most modern fans require a slightly different footprint than older units from several decades ago. Use a drywall saw to carefully trim the opening based on the template provided in the manufacturer's box. Wear safety goggles and a dust mask because this part of the job creates a significant amount of debris. Handydads recommends keeping a shop vacuum nearby to clean up the gypsum dust immediately after cutting.
-
Position the new fan housing against the ceiling joists and secure it with the provided screws or brackets. Ensure the unit is sitting flush against the drywall so the cover will fit properly later. Connect the electrical wires by matching the colors and securing them with high quality wire nuts. Attach the house ground wire to the green screw or wire on the new fan housing. Double check all connections to ensure they are tight and tucked away from any moving parts.
-
Connect the exhaust duct to the new fan's discharge port using a metal clamp or foil tape. It is vital that the duct leads directly to the outside of the home rather than venting into the attic. A loose or disconnected duct will blow humid air into your insulation and cause structural rot over time. Secure the ducting so it is as straight as possible to allow for maximum airflow and efficiency. Once the mechanical connections are finished, you can install the new decorative grille or cover.
-
Restore power at the breaker box and turn on the wall switch to test the new unit. Listen for any unusual vibrations or rattles that might indicate the housing is not mounted securely. Check that the fan is pulling air by holding a single sheet of toilet paper up to the intake. If the paper sticks to the grille, your ventilation system is working exactly as it should. Handydads suggests letting the fan run for twenty minutes after every shower to fully clear the room.
From the Toolbox
One homeowner called Handydads because their bathroom felt like a sauna long after the shower ended. Upon inspection, we found the old fan was caked in twenty years of dust and could barely spin. After we swapped it for a modern, quiet model, the customer could finally see their reflection in the mirror immediately after bathing. It was a simple change that made their morning routine much more pleasant. We always enjoy seeing how a small mechanical upgrade can change the entire feel of a room and improve the home's health.
Top 5 Mistakes
One common mistake is venting the exhaust fan directly into the attic space instead of all the way outside. This leads to massive moisture buildup in the roof structure and will eventually cause wood rot or mold. Another frequent error is choosing a fan with a CFM rating that is too low for the square footage of the bathroom. If the fan cannot move enough air, it will not effectively remove the steam during a hot shower. Many people also fail to seal the duct connections with foil tape, which allows air to leak back into the ceiling. Finally, neglecting to turn off the power at the breaker is a dangerous oversight that can lead to electrical shock.
Tool and Material Recommendations
Handydads recommends looking for fans with a low sone rating of 1.0 or less for the quietest possible operation. Brands like Panasonic and Broan Nutone are industry standards that offer reliable performance and easy installation kits. For the electrical connections, always use UL listed wire nuts and a non-contact voltage tester to ensure safety. When it comes to ducting, rigid aluminum is superior to flexible plastic because it offers less resistance to the moving air. Finally, high quality foil tape is much better than traditional cloth duct tape for sealing joints in a high moisture environment.
Quick Tips and Hacks
If you want to automate your ventilation, consider installing a wall switch with a built-in timer or a humidity sensor. This allows the fan to continue running for a set period after you leave the room without wasting energy all day. You can also use a vacuum with a brush attachment to clean the fan grille every few months to maintain peak performance. If your ductwork is old and flexible, replacing it with rigid metal ducting can significantly improve the airflow and reduce noise. Always check the sound rating, measured in sones, to ensure your new fan is quiet enough for your personal preference.