
Having a large hole in your wall can feel like a major disaster for any homeowner. Whether it was caused by a rogue doorknob or a furniture moving mishap, the damage is often quite visible and frustrating. At Handydads, we believe that every homeowner should have the confidence to tackle basic wall repairs without needing to call in a full crew. Repairing drywall is a fundamental skill that saves you money and keeps your living space looking pristine and well-maintained. This guide will walk you through the entire process of using a backer board method to ensure a permanent and seamless fix.
Project Snapshot
- Time: 2-3 hours (plus drying time)
- Difficulty: Moderate
- Cost: $20 - $40
Tools and Materials
- Drywall saw or utility knife
- Small piece of replacement drywall
- Wood scrap for backing
- Drywall screws and drill
- Joint compound and putty knife
- Sanding block and mesh tape
Step-by-Step Instructions
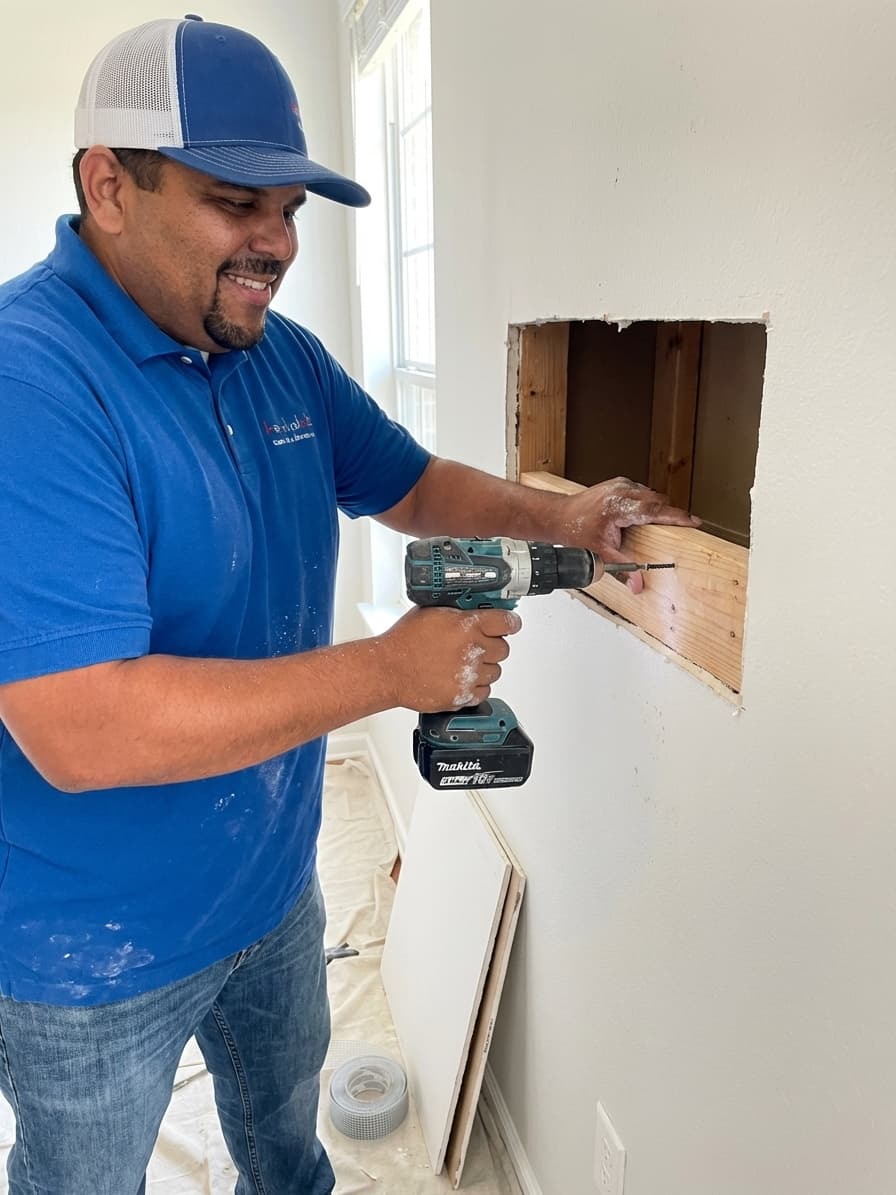
First, you must clean up the damaged area by cutting a neat rectangle around the existing hole using a drywall saw. This creates a clean frame for your patch and ensures that the new piece fits perfectly without any crumbling edges. Once the hole is squared off, cut a piece of scrap wood that is a few inches longer than the width of the opening. Insert this wood backer into the hole and secure it behind the existing drywall using standard drywall screws. Now you can cut a matching piece of new drywall to fit the rectangle and screw it directly into the wooden backer you just installed. Apply self-adhesive mesh tape over the seams to prevent future cracking and then spread a thin layer of joint compound over the area. Allow the first coat to dry completely before sanding it smooth and applying a second, wider feathering coat for a seamless transition.
From the Toolbox
I remember a time when a client called Handydads in a total panic because a heavy floor lamp had tipped over and punched a massive hole in their living room wall. They were hosting a dinner party the following weekend and were terrified that the damage would be the main topic of conversation. I arrived with my patching kit and reassured them that we could make the wall look brand new in just a couple of visits. After securing the backer board and carefully feathering the mud, the patch disappeared completely under a fresh coat of paint. The client was so relieved that they actually sent us a photo of the finished room during their party. It is always rewarding to see how a simple repair can restore a homeowner's peace of mind and pride in their home.
Top 5 Mistakes
- Not using a backer board for holes larger than a few inches which leads to a weak patch.
- Applying joint compound too thickly in a single layer instead of using multiple thin coats.
- Forgetting to sand between coats which results in visible bumps and an uneven surface finish.
- Skipping the mesh tape which almost always leads to hairline cracks appearing later around the patch.
- Failing to wipe away dust after sanding which prevents the paint from adhering properly to the wall.
Tool and Material Recommendations
For the best results, Handydads recommends using a high quality lightweight joint compound that is easy to sand and resists shrinking. A 6-inch stainless steel taping knife provides the perfect balance of flexibility and strength for spreading the mud evenly. We also suggest using fiberglass mesh tape because it is self-adhesive and stays in place while you work. For the sanding phase, a fine-grit sanding sponge is much easier to handle than loose sandpaper and produces a smoother finish. Finally, always keep a cordless drill nearby to quickly drive your drywall screws into the wooden support boards.
Quick Tips and Hacks
If you want to speed up the drying process, you can use a handheld hair dryer on a low heat setting to gently dry the joint compound. Always cut your patch piece slightly smaller than the hole to allow plenty of room for the joint compound to fill the gaps. When sanding, wear a dust mask and hang a damp sheet over the doorway to prevent fine white dust from spreading throughout your entire house. To check if your patch is truly flat, hold a flashlight against the wall at a sharp angle to highlight any shadows or imperfections. Finally, remember to prime the patched area before painting to ensure the texture matches the rest of the wall perfectly.